What Is Handloading and Why Do It?
Handloading is the process of assembling ammunition from individual components rather than buying factory-loaded rounds.
Shooters measure powder charges, seat bullets, and prime cases to create ammo tailored to their firearms.
This practice gives you meaningful control over ballistic performance and per-round cost.
The Sporting Arms and Ammunition Manufacturers’ Institute (SAAMI) sets industry standards for pressure limits and dimensional tolerances.
Most reloaders work within SAAMI guidelines to keep chamber pressures safe and function reliable.
Cost Savings and Custom Performance
Factory .308 Winchester often costs ($0.70–$1.00 for budget .308, $1.50–$2.00 for premium match loads) per round. Comparable handloads run $0.60–$1.20 depending on components.
For high-volume shooters (500+ per month), savings add up.
More importantly, handloading lets you tune bullet seating depth and powder charge for your barrel and chamber.

Understanding the Basics of ReloadingThe Four Essential Components
Every cartridge contains four critical parts that work together during firing:
- Primer — small explosive cap that ignites the powder
- Powder — propellant measured in grains (1 grain = 0.0648 g)
- Brass case — reusable container that seals the chamber
- Bullet — the projectile (lead, copper, or gilding metal)
How Each Component Affects Performance
Primer consistency influences velocity spread.
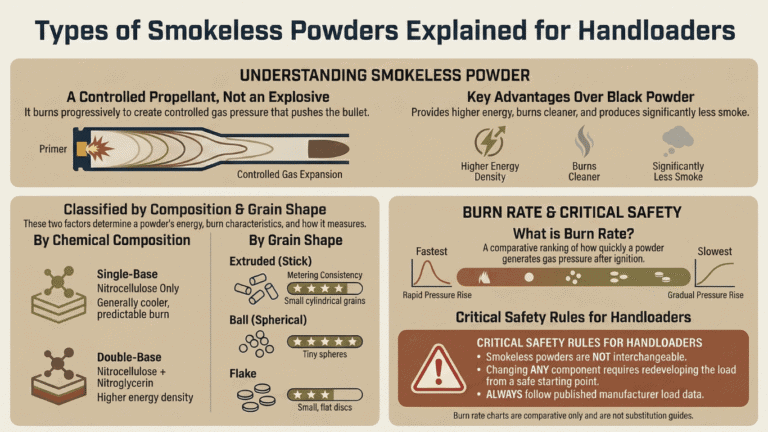
Powder burn rate determines the pressure curve (faster often for handguns, slower for rifles).
Case quality affects longevity and how well the case seals then springs back.
Bullet weight/design set ballistic coefficient (BC), which governs drag in flight.

Equipment You’ll Need to Start
Basic reloading equipment spans five tool categories:
- Reloading press
- Die set (resize/expand/seat)
- Powder scale (to 0.1-grain resolution)
- Case-prep tools (trimmer, deburring tool, primer pocket cleaner)
- Tumbler (vibratory or rotary)
Entry kits from Lee Precision: $150–$200 (single-stage).
Mid-tier RCBS kits: $300–$400.
Reliable digital scales from Hornady/RCBS: $50–$100 to prevent overcharges.
If you’re still choosing a press style, start with this overview of types of reloading presses before you buy.
Press Types: Single-Stage vs Progressive
| Feature | Single-Stage Press | Progressive Press |
|---|---|---|
| Speed | 50–100 rounds/hour | 300–500 rounds/hour |
| Complexity | One operation per stroke | Multiple operations simultaneously |
| Cost | $100–$300 (RCBS Rock Chucker, Lee Classic Cast) | $400–$800 (Hornady Lock-N-Load, Dillon 550) |
| Best For | Precision rifle; beginners | High-volume pistol; experienced reloaders |
| Error Risk | Lower (manual verification each step) | Higher (automation can mask mistakes) |
A single-stage runs one case at a time, encouraging careful inspection.
A progressive press indexes multiple cases through stations per handle pull—high output, tighter QC.
For a real-world progressive setup, see my hands-on Dillon XL650 progressive press review.

Understanding Load Data and Ballistics
Load data tables list safe powder charges for specific bullet/powder combinations (e.g., Hodgdon).
You’ll see starting loads (conservative) and maximum loads (upper safe pressure).
Chamber pressure (PSI/CUP) must remain within SAAMI specs—often 50,000–62,000 PSI for modern rifle cartridges.
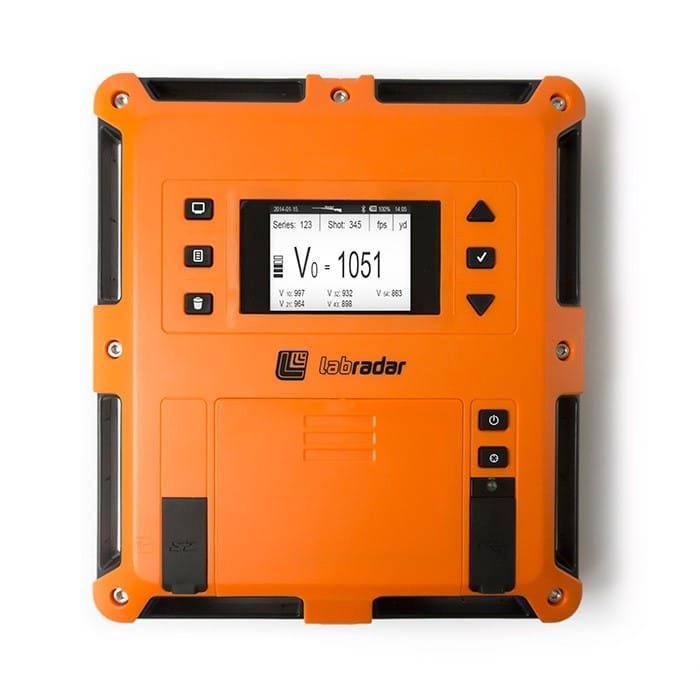
Standard deviation (SD) and extreme spread (ES) measure velocity consistency.
Lower SD/ES translates to more predictable trajectories at long range.
To verify speeds and SD/ES during testing, a ballistic chronograph is the most useful tool on the range.
Reading Load Tables Correctly
For cartridge-specific charge ranges tested with current powders, consult the Hodgdon Reloading Data Center.
Start 10% below max and work up in 0.5-grain increments, watching pressure signs.
Never exceed published maximums. Powder lots vary, and small overcharges can spike pressure.
If you want the cost side dialed in too, the reloading calculator makes per-round math painless.
Step-by-Step Reloading Process
The complete process:
- Inspect fired brass (cracks, bulges, split mouths) — discard damaged cases.
- Clean cases in a tumbler (walnut/corn-cob media) until bright.
- Resize and deprime with a full-length sizing die.
- Trim to length using a case trimmer when cases exceed spec.
- Deburr and chamfer case mouths.
- Prime cases (hand tool or press-mounted).
- Charge powder with scale-verified charges; visually inspect each case.
- Seat bullets to COAL using a seating die (micrometer helps).
- Apply crimp if needed (semi-autos or heavy recoil).
Turret presses strike a nice balance between speed and control; here’s my Redding T7 turret press review.
Case Preparation and Inspection
During firing, the case head pushes against the bolt face and brass stretches forward.
Trim when length exceeds SAAMI maximum—often after 3–5 firings depending on pressure.
Manuals list trim-to length (typically 0.010″ under max).
Uniform case length supports consistent neck tension, which stabilizes SD/ES.
View this post on Instagram
Safety First: Critical Rules and Practices
Never deviate from published load data—manufacturers test with instrumentation not found at home.
SAAMI limits exist to protect guns and people.
- Wear safety glasses.
- Work in ventilated areas (lead dust).
- Keep powder containers closed when not in use.
- Never mix powders (burn rates differ).
- Double-check every powder charge (use a second scale if unsure).
- Store primers in original packaging away from heat.
Recognizing Overpressure Signs
Watch for flattened primers, cratering, hard bolt lift, sticky extraction, ejector marks, or case-head separation.
Any of these suggests pressure is too high—step back down.
For official pressure limits and chamber/ cartridge drawings, see the SAAMI technical standards used by U.S. ammunition manufacturers.
Legal Requirements: US vs Canada
Personal reloading requires no license in either country; storage limits differ.
| Aspect | United States (ATF) | Canada (Explosives Act) |
|---|---|---|
| Personal Use License | None (non-commercial) | None (personal amounts) |
| Powder Storage Limit | No federal limit (check local/state) | 75 kg max without permit |
| Components Regulation | Primers regulated as explosives | Primers/powder require proper storage |
| Sale of Reloaded Ammo | FFL required to sell | Prohibited without manufacturer license |
| Record Keeping | Not required for personal use | Not required for personal quantities |
Common Mistakes vs Best Practices
Most accuracy issues trace to a few recurring errors.
| Mistake | Consequence | Best Practice |
|---|---|---|
| Inconsistent seating depth | Rising ES; poor groups | Use a micrometer seating die; check COAL every 5 rounds |
| Excessive neck tension | Erratic pressure; velocity spikes | Aim ~0.002–0.003″ under bullet diameter |
| Over-crimping | Deformed mouths; setback | Minimal crimp for semi-autos; none for bolt guns |
| Skipping weight verification | Double-charges or squibs | Weigh every charge or use a check-weight system |
| Over-used brass | Case-head separation risk | Inspect primer pockets after 5–8 firings |
Troubleshooting Consistency Issues
High SD/ES (e.g., >15 fps SD or >30 fps ES) point to non-uniform components or setup.
Measure neck thickness with a ball micrometer; >0.002″ variance may need neck turning.
Re-verify charge weights—progressive measures can drift.
Check runout with a concentricity comparator; misaligned dies push bullets in crooked.
Myths About Handloading Debunked
Myth: Maximum loads are most accurate.
Reality: Many rifles shoot best 1–3 grains below max at known nodes.
Myth: Handloading always saves money.
Reality: Gear costs $300–$500; break-even can take 1,000–2,000 rounds.
Myth: Reloaded ammo is inherently dangerous.
Reality: Staying within published data windows keeps risk comparable to commercial ammo.
Myth: Handloads always beat factory match.
Reality: Good factory match can outperform poor handloads—method matters.

Getting Started: Your First 50 Rounds
Begin with a common cartridge like .223 Remington, .30-06, or 9mm where load data is abundant.
Buy a quality single-stage kit (e.g., RCBS or Lee Precision), a reliable powder scale, and a tumbler.
Choose one bullet weight and one powder from published data.
Start 10% below max.
Build 10-round batches in 0.5-grain steps, logging velocity and pressure signs.
When you find an accuracy node (groups tighten; SD drops), load 20 rounds to confirm.
Keep it inside the data window and stay consistent.
A Reloading manual offers a comprehensive overview of the reloading process. It covers critical topics such as understanding different tools, reading load data, and the principles behind each step.
Load data manuals provide specific data, tailored to different calibers, powders, bullet weights and barrel lengths. They combine practical recipes with insights into the science of ballistics.
It is crucial to have at least one comprehensive reloading manual; however, you may end up with more load data manuals over time.
If you want a simple path into reloading, compare types of reloading presses and pick a starter kit that fits your pace.
Frequently Asked Questions
Is handloading cheaper than buying factory ammunition?
Yes, after initial gear ($300–$500) is recovered—often a 40–60% drop per round.
Do I need a license to reload in the US?
No license for personal use. You need an FFL only to sell reloads.
How many times can I reuse brass cases?
Rifle cases: 5–8 firings (watch primer pockets).
Pistol cases: often 10–15 due to lower pressures.
What do SD and ES mean?
SD is average velocity variation; ES is the fast/slow gap.
Lower numbers mean more consistent performance.
Can I use any powder with any bullet?
No. Follow published load data per cartridge—powders have very different burn rates.
What’s the difference between SAAMI limits and maximum published loads?
SAAMI sets industry pressure limits (e.g., ~62,000 PSI for .308 Win).
Published maximums approach those limits but stay within them—start 10% low and work up.


